Video Tutorial
Welcome to themex Theme Documentation Page. With the RTF (Rich Text Format) Documentation for the themex WordPress Theme, we’ve tried to make some video documentation. In those video documentation, we’ve shown the total procedure for each particular part of themex Theme; such as;- (Theme Installation, Required Plugins Installation, Theme Activation, Demo Import, Customization Most Of the Pages and much more). Hopefully, it will help you so much to customize the theme and creating a stunning web page using the themex Theme. Here the video playlist;
How To Install Theme & Demo Content
After seeing those videos, please give us your recommendation/feedback to make better something for all of you. Please subscribe to our YouTube Channel to get any update instant.
Subscription Link;-
https://www.youtube.com/channel/UCSLm_h-xmahiNZuZYoOwA9A/videos
Getting Started
WordPress Installation
Before beginning the installation and configuring of your new theme, you must have WordPress installed. If you need to install WordPress then please visit: http://wordpress.org/download/. If you need any help with the installation , please refer to this guide: http://codex.wordpress.org/Installing_WordPress.
Here is a brief step by step on how to install WordPress:
- Download and unzip the WordPress package if you haven't already.
- Create a database for WordPress on your web server, as well as a MySQL user who has all privileges for accessing and modifying it.
-
Upload the WordPress files in the desired location on your web server:
- If you want to integrate WordPress into the root of your domain (e.g. http://example.com/), move or upload all contents of the unzipped WordPress directory (but excluding the directory itself) into the root directory of your web server.
- If you want to have your WordPress installation in its own subdirectory on your web site (e.g. http://example.com/blog/), create the blog directory on your server and upload WordPress to the directory via FTP. Note: If your FTP client has an option to convert file names to lower case, make sure it's disabled.
-
Run the WordPress installation script by accessing wp-admin/install.php in a web browser.
- If you installed WordPress in the root directory, you should visit: http://example.com/wp-admin/install.php
- If you installed WordPress in its own subdirectory called blog, for example, you should visit: http://example.com/blog/wp-admin/install.php
Server Requirements
MINIMUM REQUIREMENTS
- WordPress 5.9 or greater
- PHP version 7.0 or greater
- MySQL version 5.6 or greater
WE RECOMMEND YOUR HOST SUPPORTS:
- PHP version 7.4 or greater
- MySQL version 5.6 or greater
- Latest WordPress Version or greater
Minimum PHP requirements
	PHP time limit (max_execution_time) 1000
	max_input_time = 60
	PHP memory limit (memory_limit) 512M
	post_max_size = 512M
	Max upload size (upload_max_filesize) 512M
	File upload permission (file_uploads) set to Available
Use this code For the Elementor Editing and Demo Import Problem in your PHP.ini file on the hosting server.
	max_execution_time = 1000
	max_input_time = 60
	max_input_vars = 1000
	memory_limit = 512M
	post_max_size = 512M
	upload_max_filesize = 512M

Theme Installation
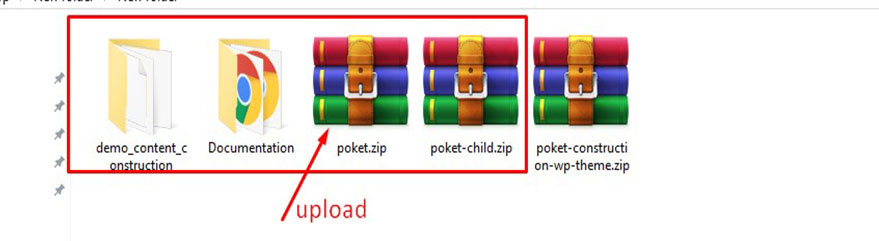
You can view your downloaded file, and unzip the folder. Then upload the themex.zip folder.
There are two ways to install theme:
-
FTP Upload:
- Open up your FTP manager and connect to your hosting
- Browse to wp-content/themes
- Then Upload the themex theme folder.
- Log Into WordPress and go to Appearance - Themes.
- Find the themex and click activate
-
WordPress Upload:
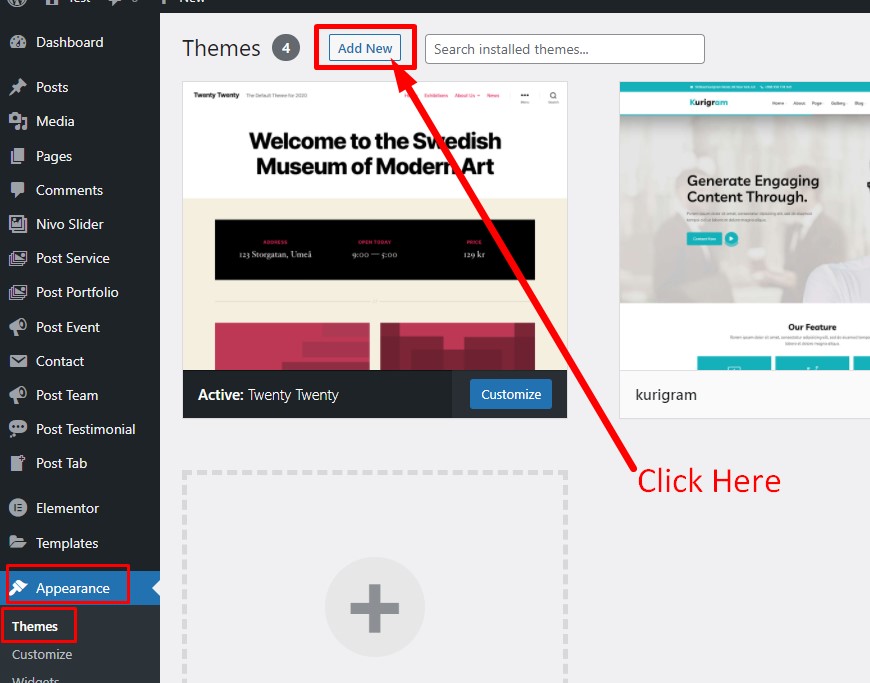
- Navigate to Appearance Add New Themes Upload.
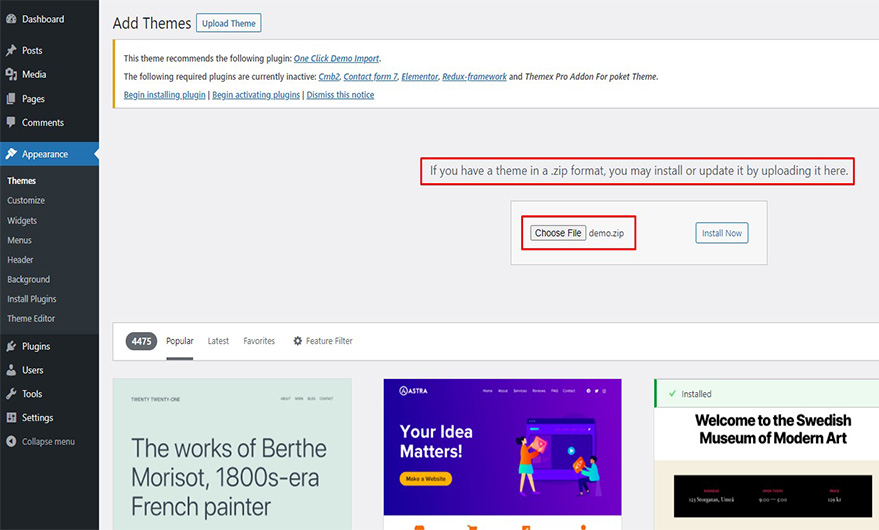
- Follow the instructions on the screen, select the downloaded theme folder ( themex.zip* ).
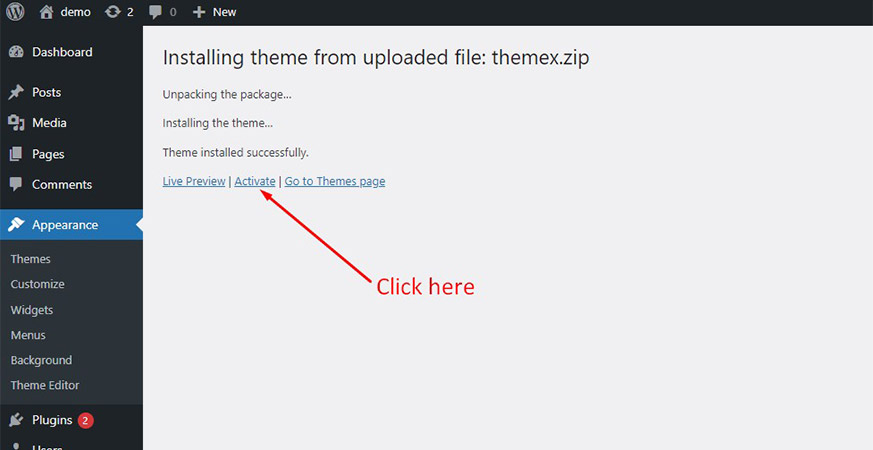
- Hit Install Now and the theme will be uploaded and installed.
- Find the themex and click activate
Step 1
Step 2

Step 3
Step 4
Install Required Plugins
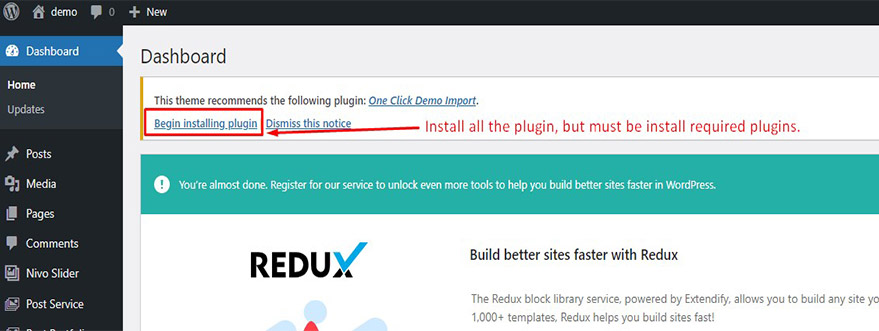
When you have successfully installed the theme , you will be asked to install the required plugins
Step 1
Step 2
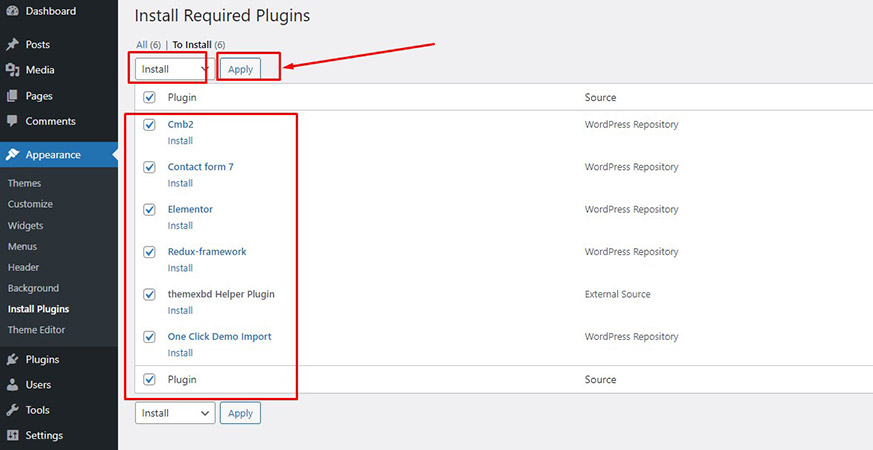
Step 3
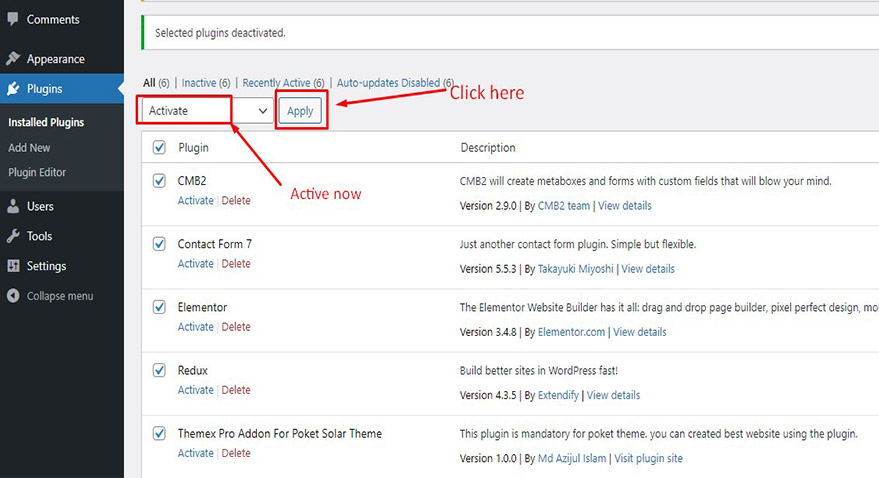
Then click on the begin installing plugins , choose the plugins you want to install or select all and then click install. After Installaling the plugins, go back to "Install Plugins" option from left side and activate the plugins.
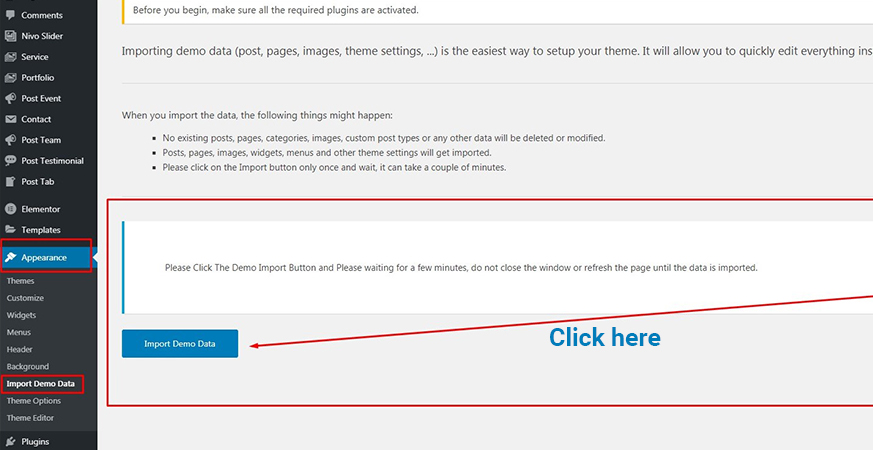
Demo Data Import (Optional)
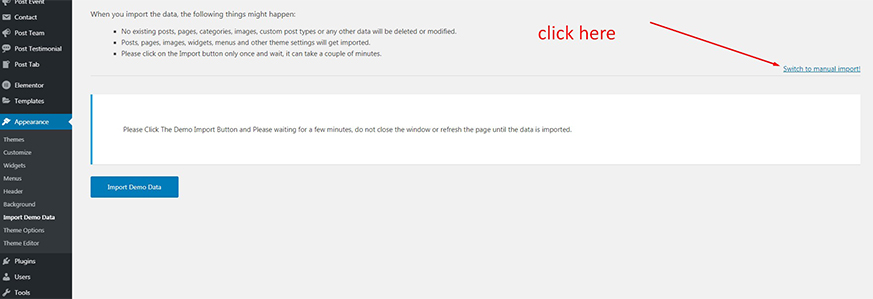
You can use demo import plugins
- use one click demo import plugin for all avobe Link( Note: We added it in our theme )
- Or you can use WordPress-importer(default)
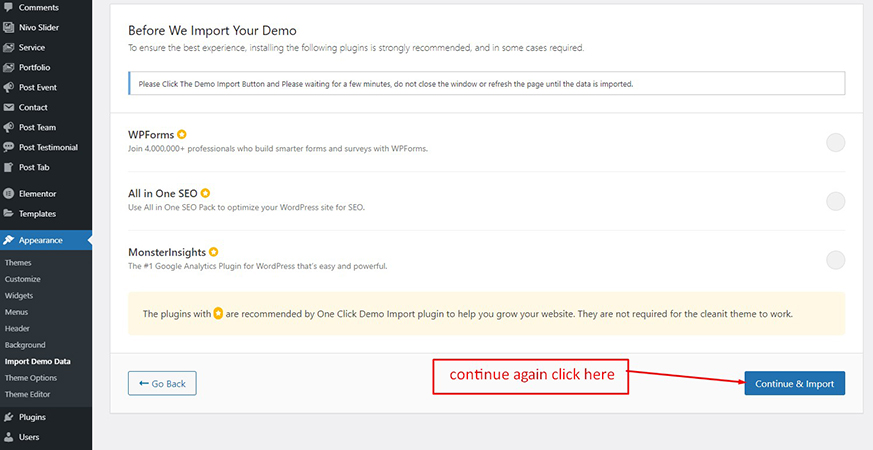
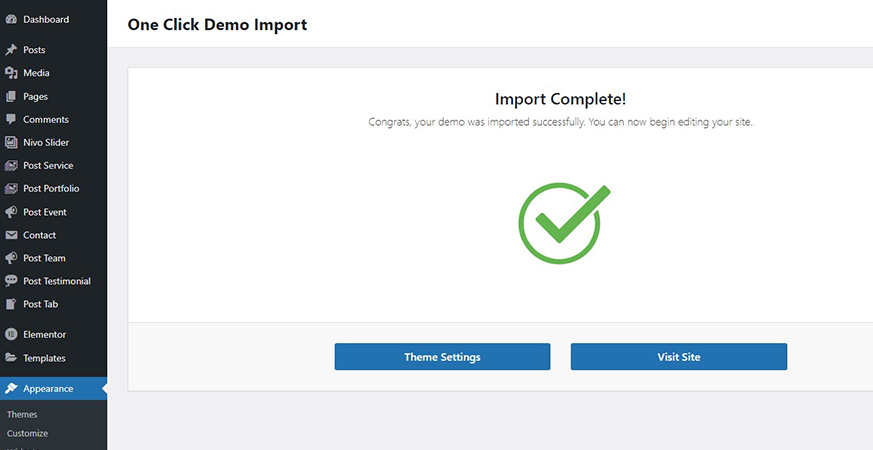
Follow the steps to import the demo content and leave the final page to load with a confirmation that the content has been imported successfully (this may take some time).
For one click demo importer ( Start Now )
Step 1
Step 2
Step 3
Another Way
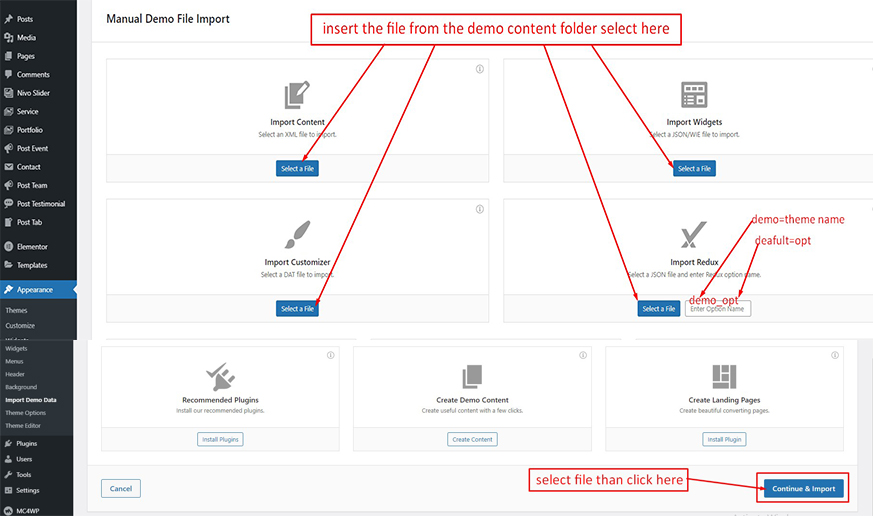
the theme content have been provided so that you can set up the theme to look exactly like the our demo in a few minutes. You can find that inside "demo-content" folder.
- themex.xml for all content
- themex-widget.wie for widget content
- themex-export.dat for customize content
- themex_opt.json for Redux
- Redux Option Name - " themex_opt "
Step 1
Step 2
Step 3
Or Manual Import
However, you will get all demo content data with the theme package. You will find the demos in the demo_content folder in your theme package. If you failed to import the demo content with one click then you have to follow the below steps to import the demo content manually.
- Navigate to Tools > Import then install the WordPress plugin and click on the ‘Run Importer’. Upload here the "themex.xml" file
- Install the ‘Widget Importer & Exporter‘ plugin to import the demo widgets. Then navigate to Tools > Widget Importer & Exporter and upload here the "themex-widgets.wie" file.
- Now you have to import the Theme Settings as like the demo. Navigate to Theme Option > Import / Export. Then click on the Import from File button and copy-paste the backup string here and click on the Import a Backup button. You will find the backup string in the themex_opt.json file.
                                 sometime when you upload your demo content, you can see some error.
                                 example- upload_max_filesize, Time out and etc that time you need increase you upload_max_filesize and time into your cpanel. if you can't solved this issue, Please Contact your hosting provider. They will solved your problem.
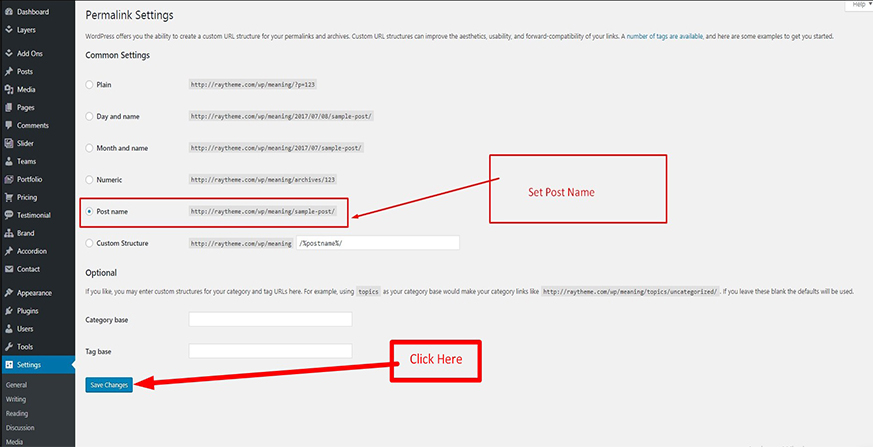
Permalink Setting
When finished your Demo content add in your theme, That time setting to your Permalink Setting
Step:01
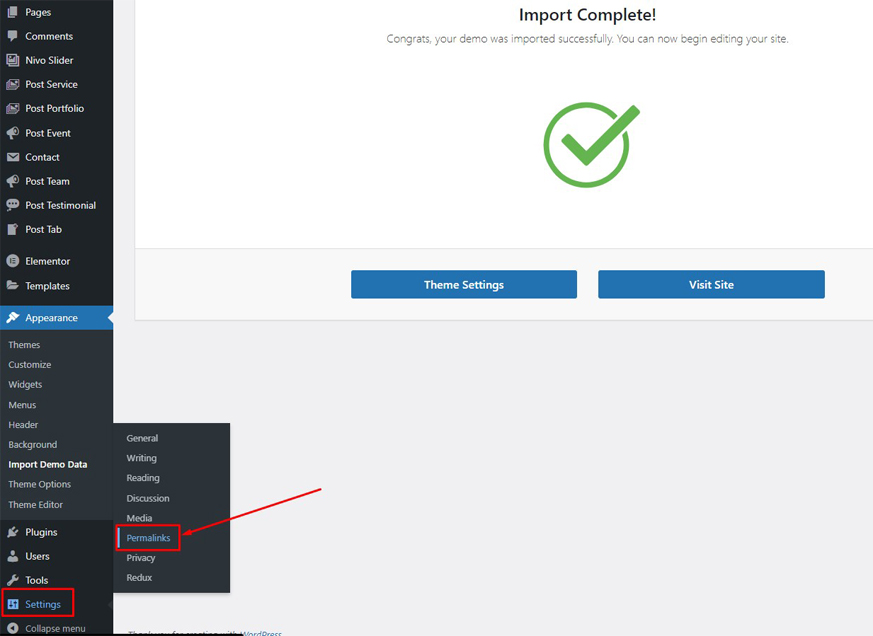
Step:02
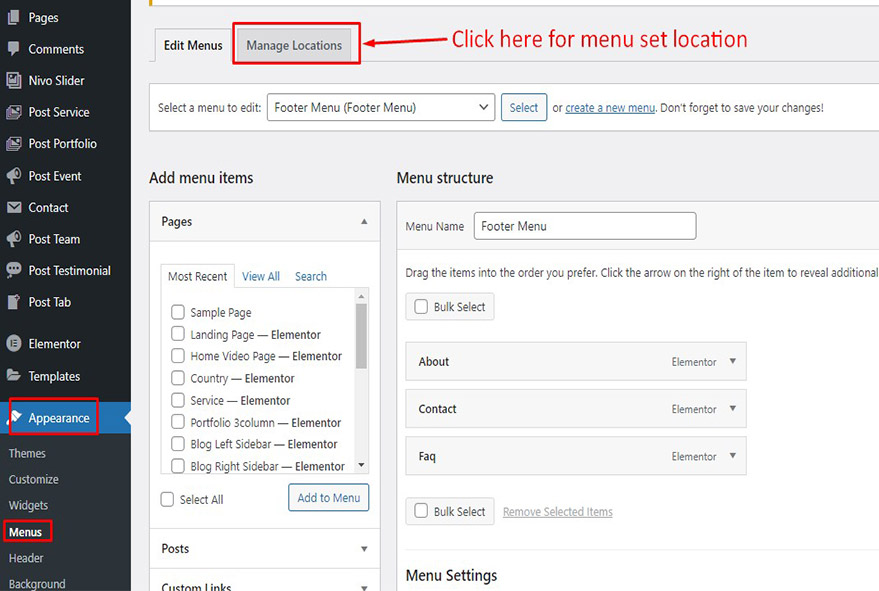
Menu
Please see the below, how to set menu.
How to make Menu? Same look like live demo theme.
How To setup Menu? When Finished demo content.
1. Now Click on the manage Location for set menu.
2. select the menu correct location and save the menu.
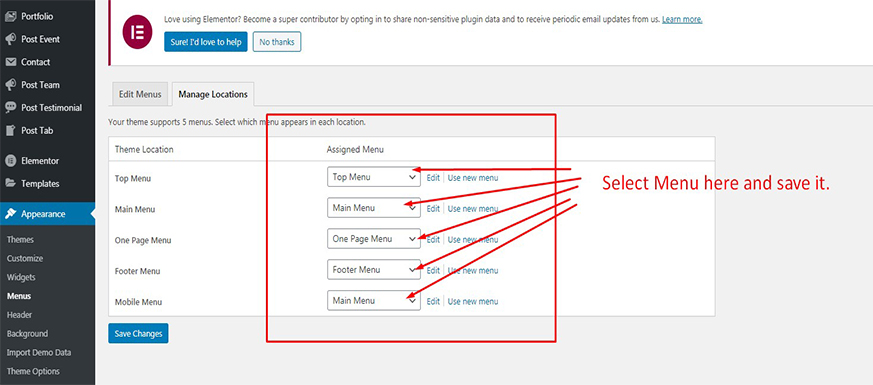
3. Now Check the menu on your site. you can saw it work fine.
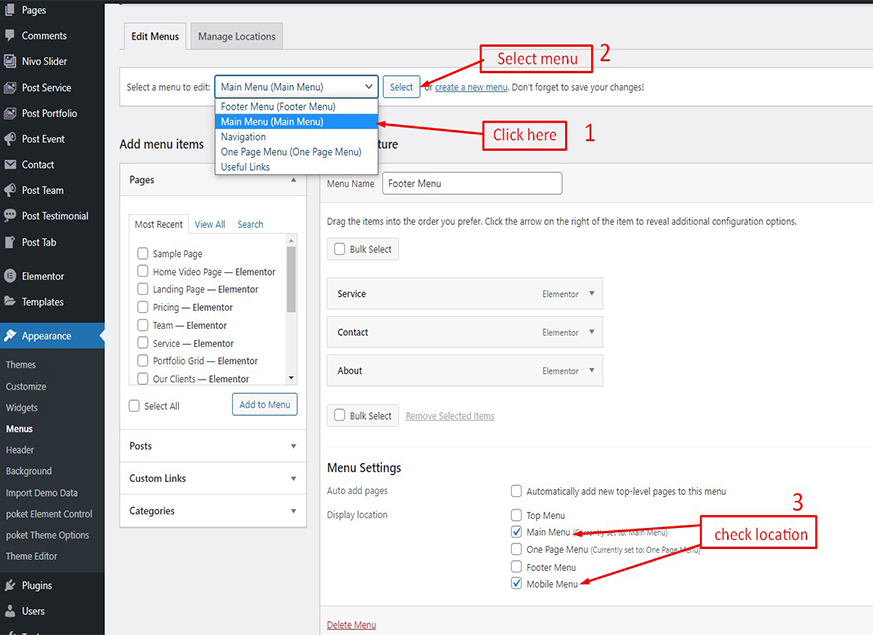
1. you can checked, your selected menu from below way.
Theme Options
We make a better theme option for you in our theme. If you can easily customize and change in our theme. I hope, it will be help you creating a new website.
Step:01
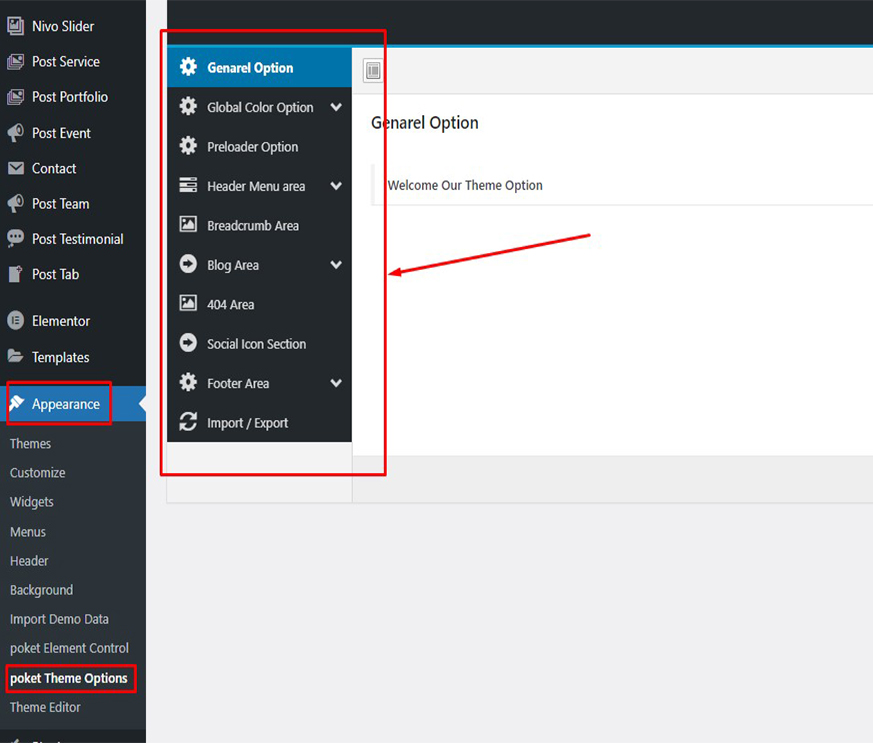
Header
The header is a compulsory part of a theme.
Default Header:
You can change the default header style, menu action button style, logo style and other header relevant properties from Theme Options > Header area.
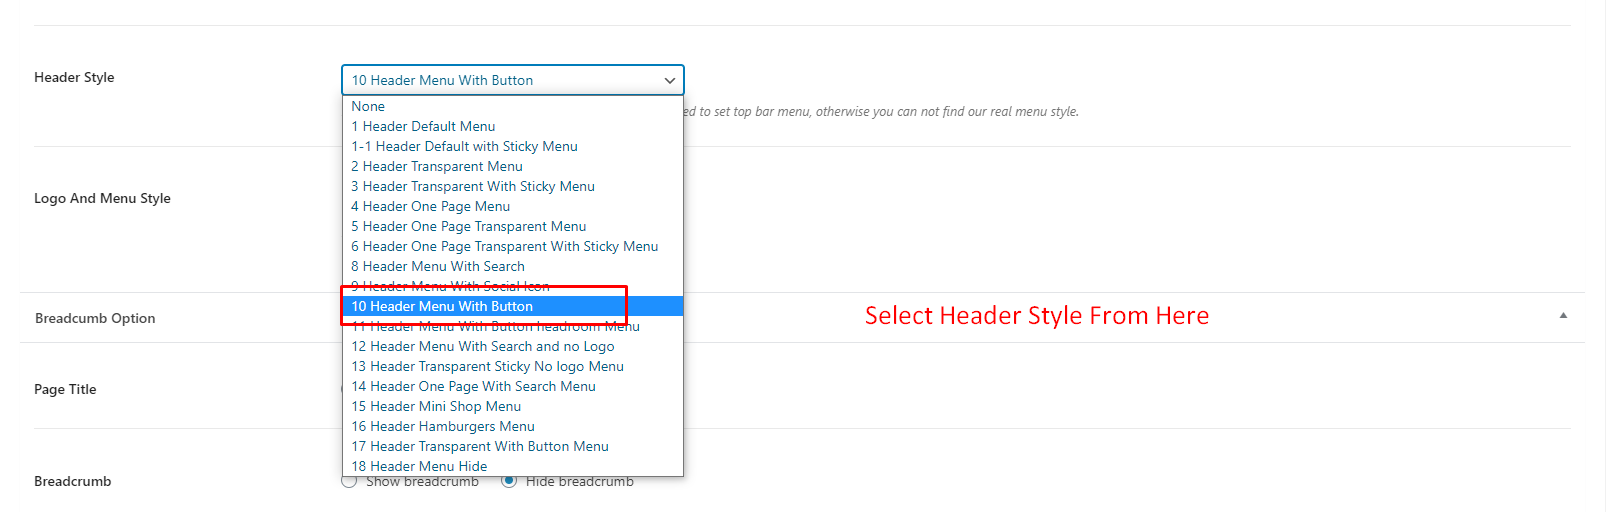
In this theme, Here Have Two Way Set Header Style
You can set header two way in our theme.
- One your can set the header style in theme option. that shows your all page and post.
- Another is, you can set the menu header style in your every page and post below. that time you can show the different header on different page and post.
- It also a info for you That the top header add similar way.
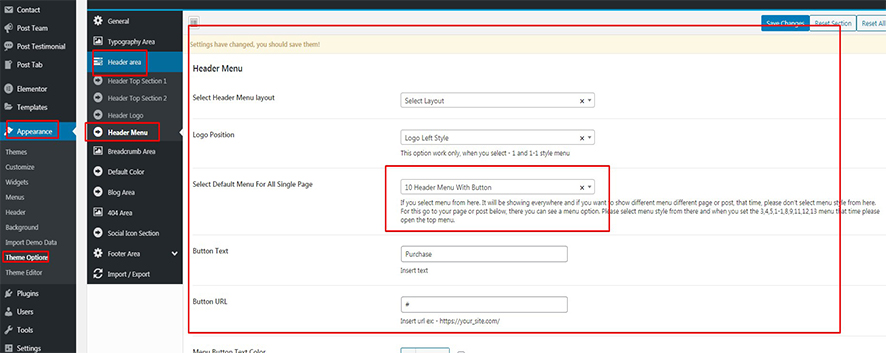
How To set theme Header Style?
How To set theme Header Style?
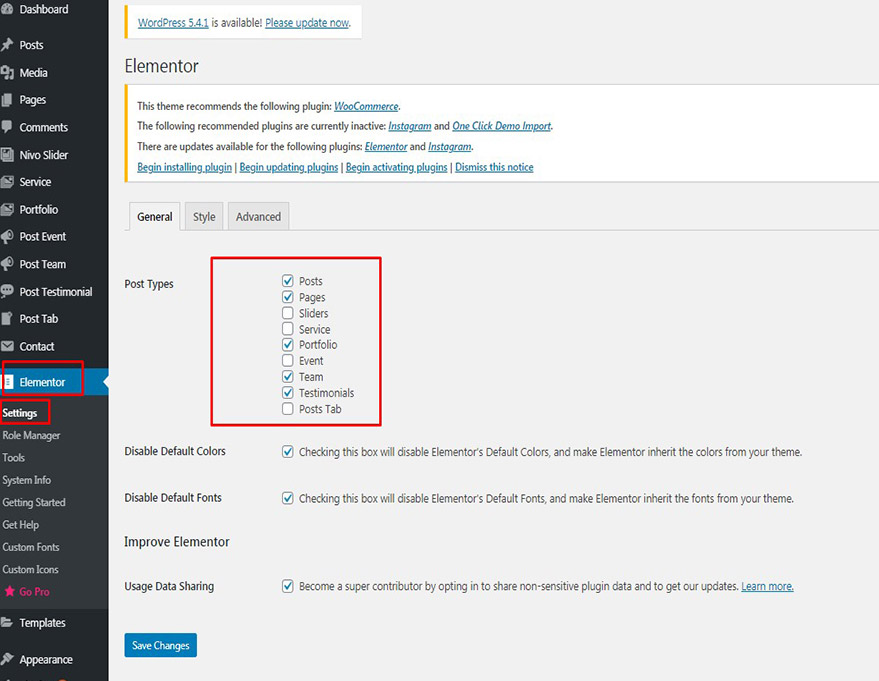
1. Header Option
If you select menu from here. It will be showing everywhere and if you want to show different menu different page or post, that time, please don't select menu style here. For this go to your page or post below, there you can see a menu option. Please select menu style from there. when you set menu the 3,4,6,1-1,8,9,10,12,13,14,20,21,22,24 menu, that time you need to select top menu for real theme style.
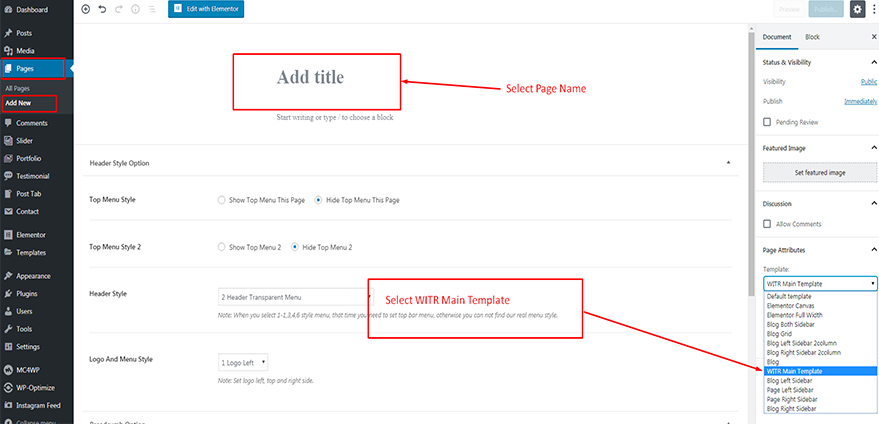
2. Page Option
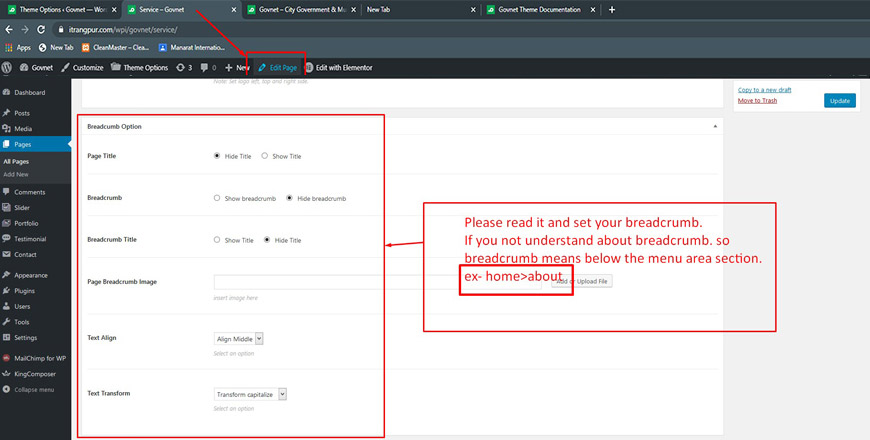
It will be find your edit page below area
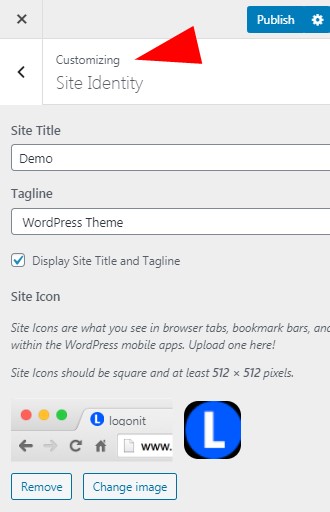
Theme Logo
How To Set Logo in this theme
Step:01
Make Breadcrumbs For Post/Page
Some Breadcrumb Option you can find From our theme option
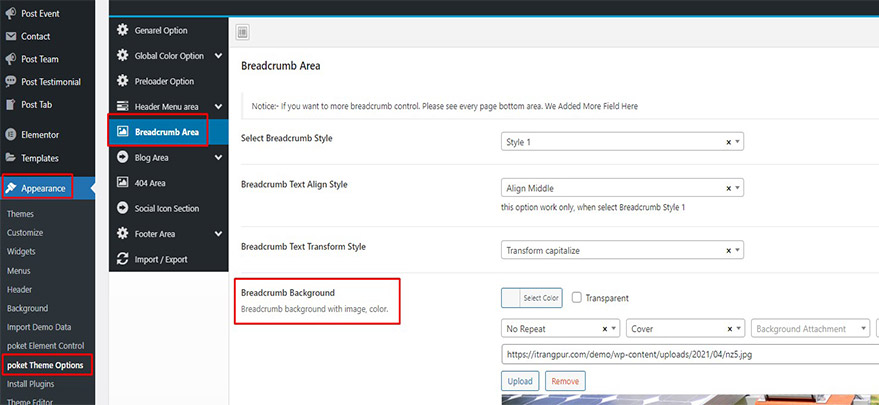
See the page below, you can see here lot of option
Footer
Footer is a compulsory part of a theme. In themex, you have a lot of options to edit the Footer yourself.
How To Set Footer in this theme
How to set footer and Mailchimp after Demo content import
Step: 1
Footer Customize
We area created 4 different footer, with 10+ style in our theme
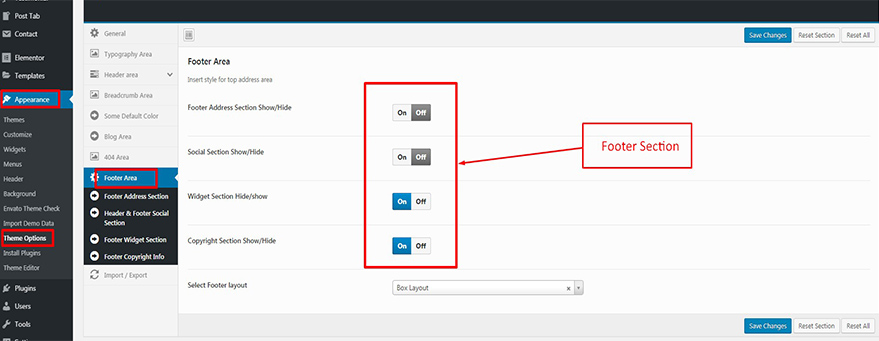
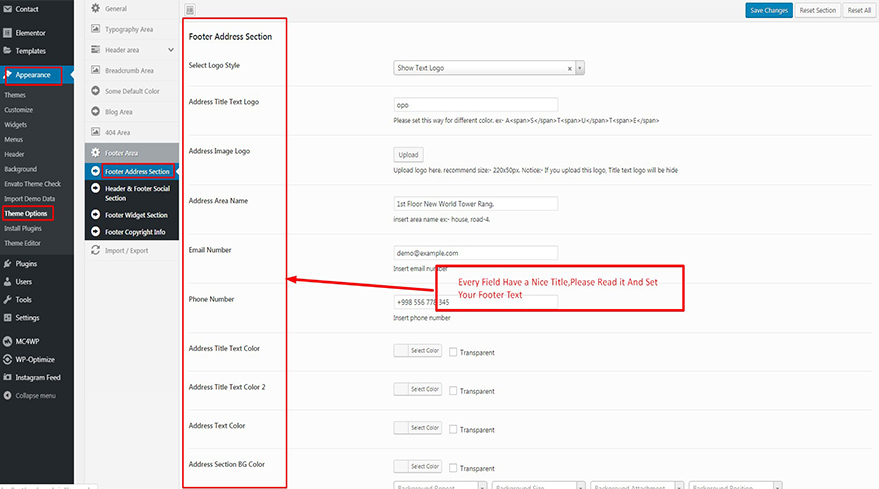
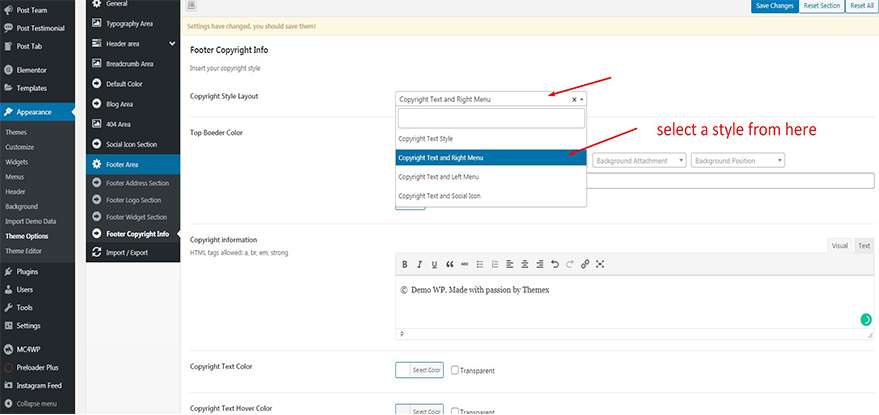
Set your footer style from here
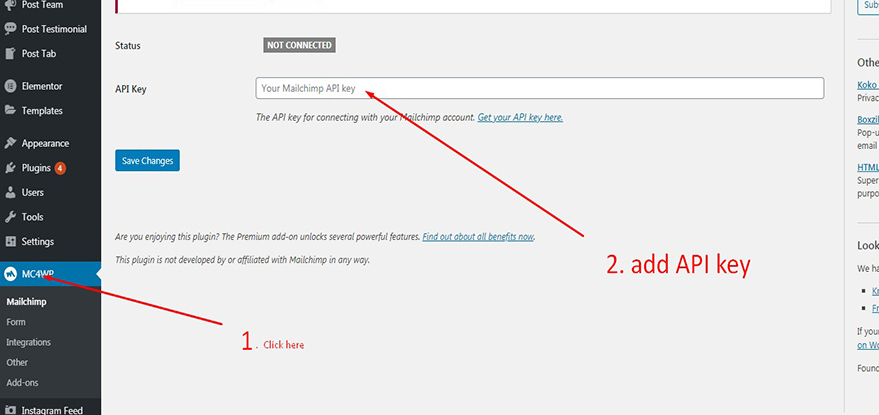
Set Footer Mailchimp
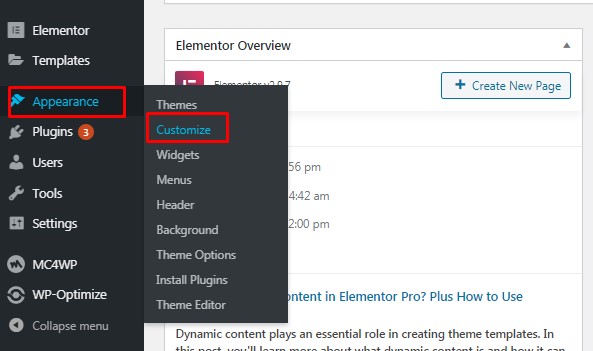
Theme Customize
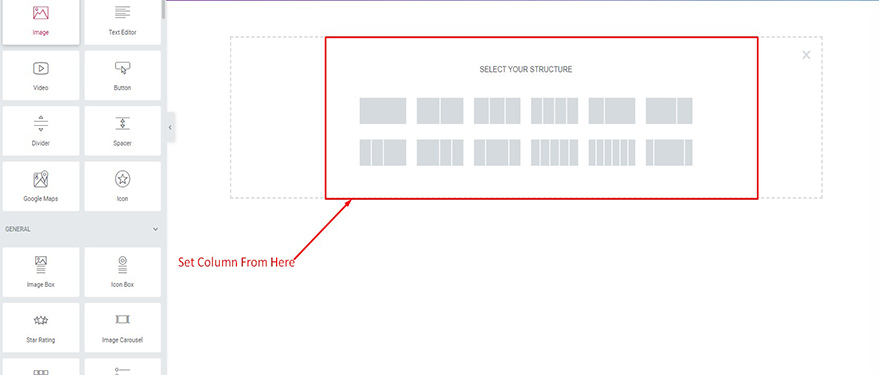
Create your Page
Step: 1
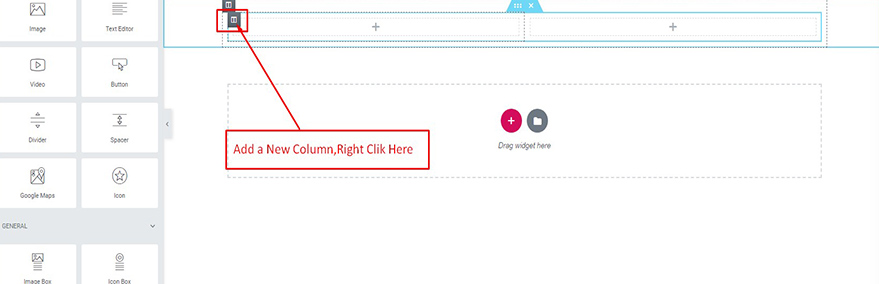
Step: 2
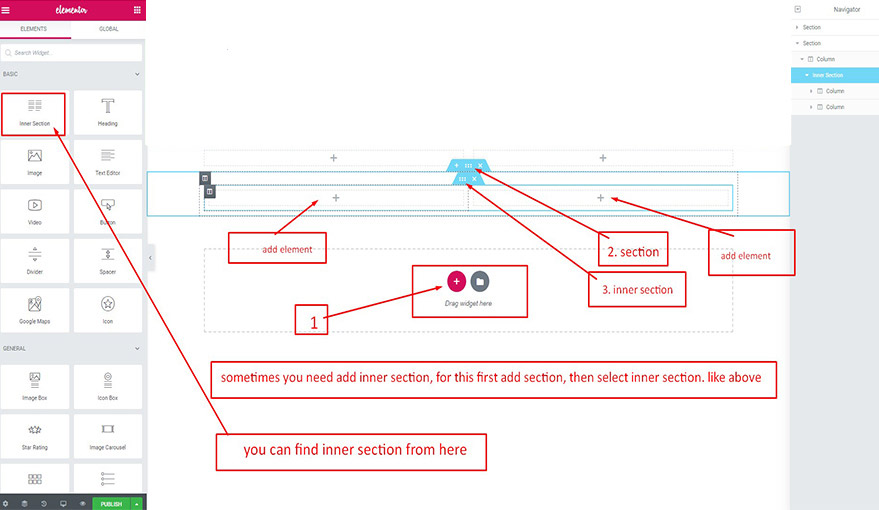
Step: 3
Step: 4
Step: 5
Step: 6

Step: 7
Step: 8
Suppose,We select Featuer Widget
Step: 1
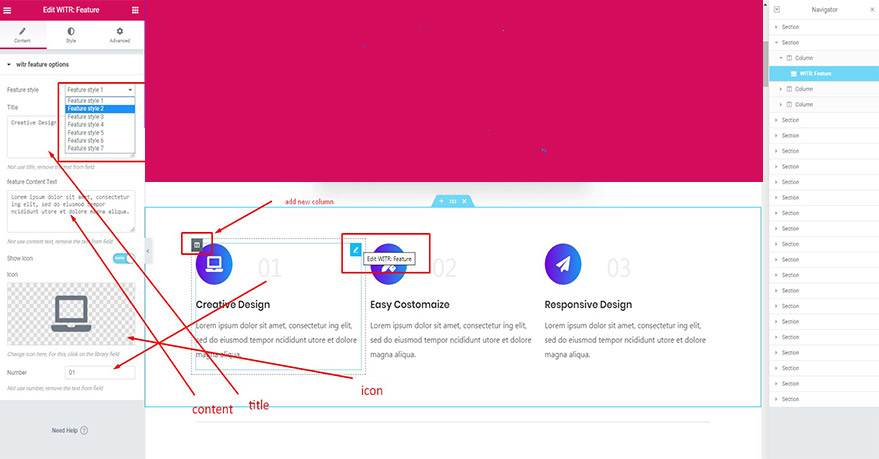
Step: 2
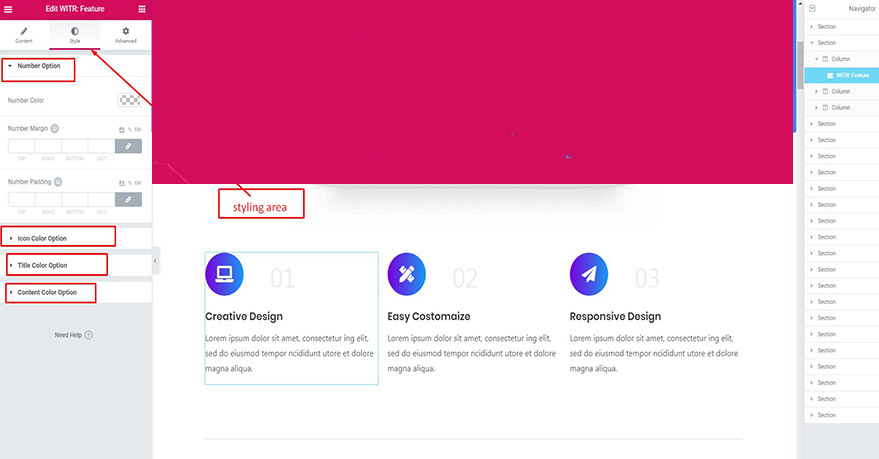
Step: 3

Our All layout features similar, you can add your section by similar way.
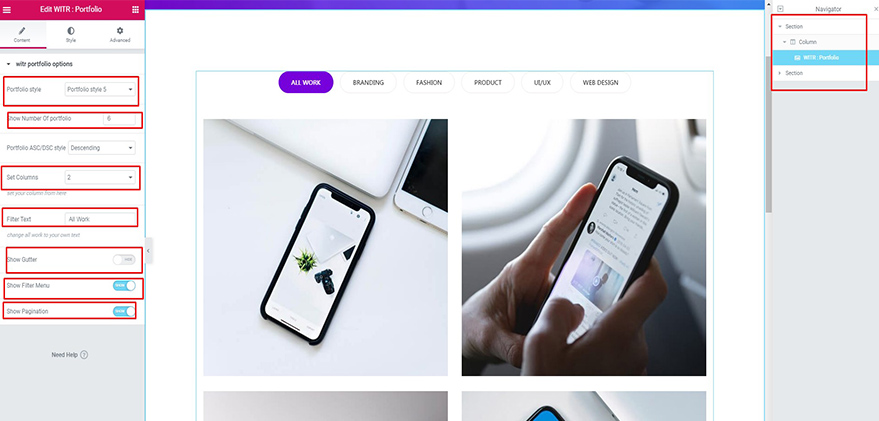
Make Protfolio
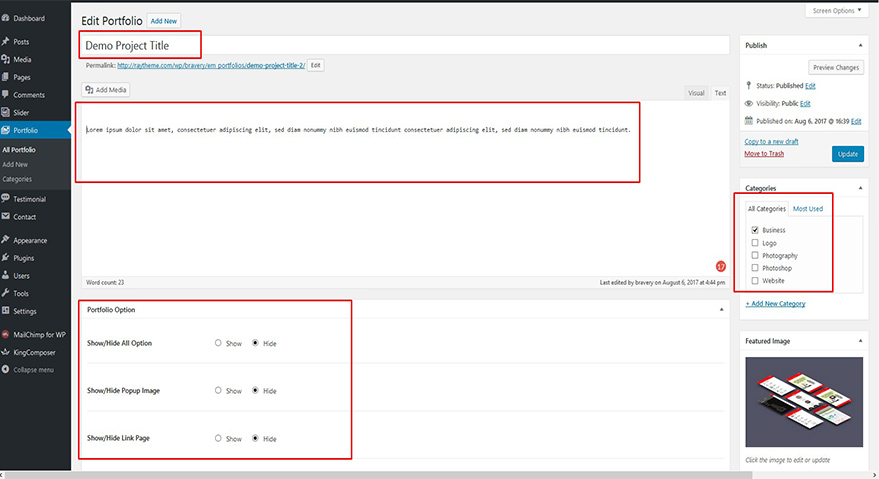
---Must be Create one Category and Select Post Minimum One Category For Show.---
Step: 1
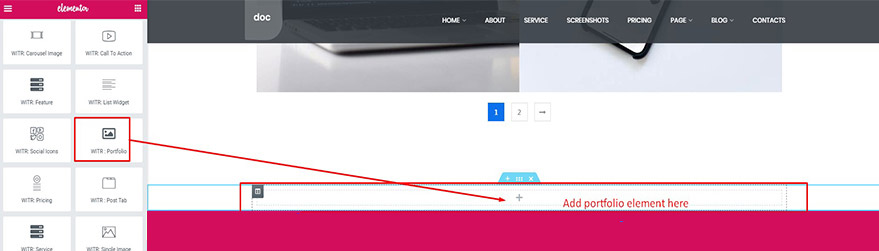
Step: 2
---All post elements is similar with portfolio.But Other post element not require create category---
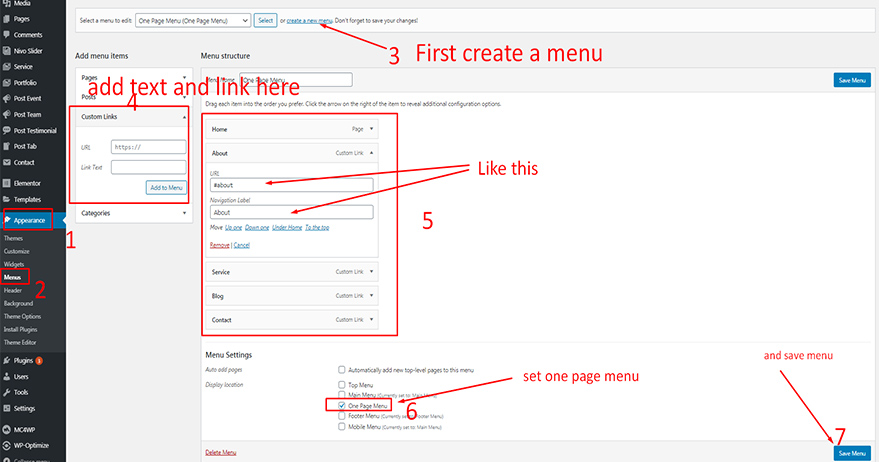
How to Create a New Menu?
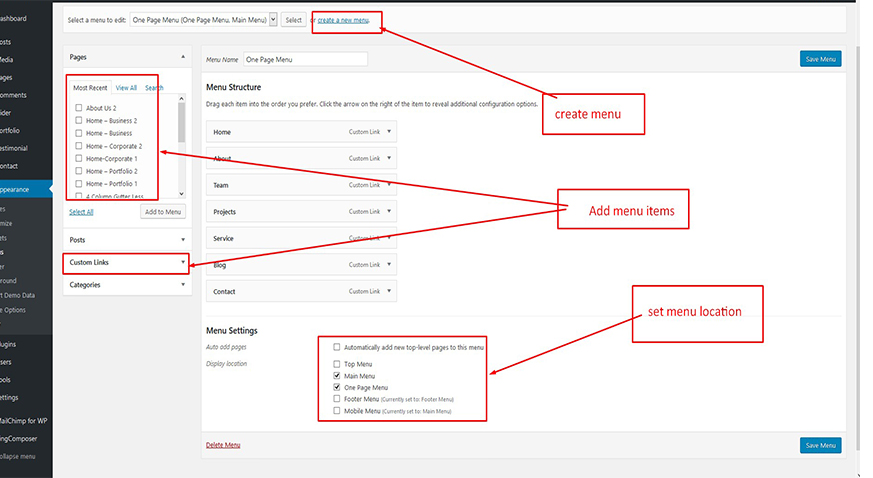
If you want to use only one page menu, That time please select all menu location one page.
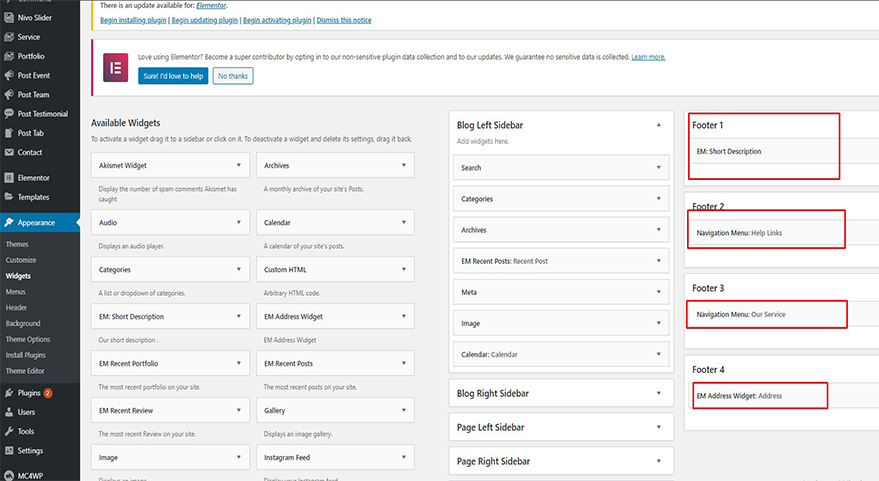
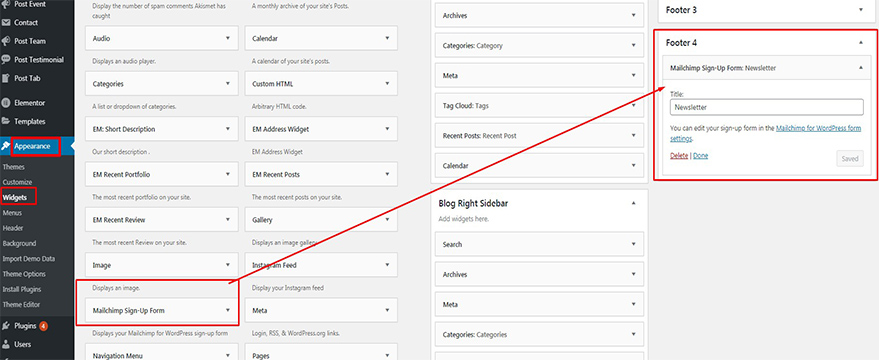
Widgets Sidebars
Set Footer widget and Sidebars below way.
Step: Sidebar Widgets
The Sidebars show in your Blog, Page and shop area.
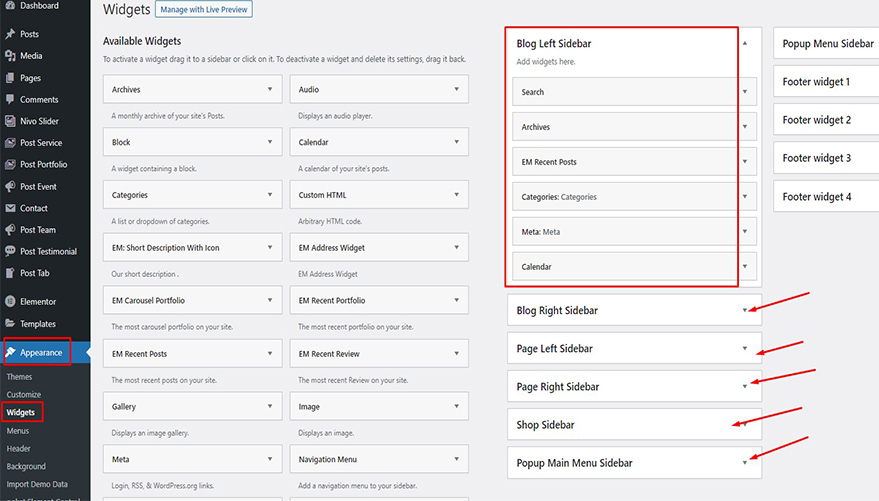
The more option Find in Theme Option Footer Area...
Forms (Contact,Subscribe)
In this section, we included all the forms that are used in the theme. All form templates are Contact Form 7 Plugin and Subscribe Form use from MC4WP: Mailchimp for WordPress Plugin. We also encourage you to actively use the below.
Content of Elements In this page
Contract Form
Subscribe Form
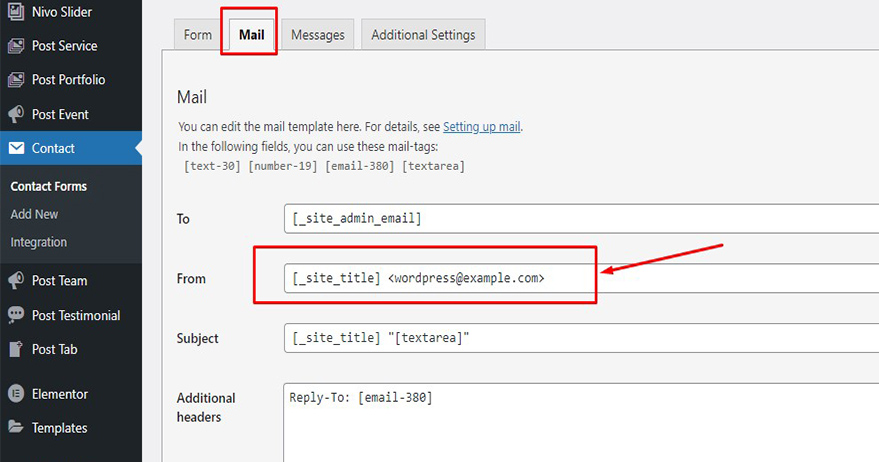
Contract Form
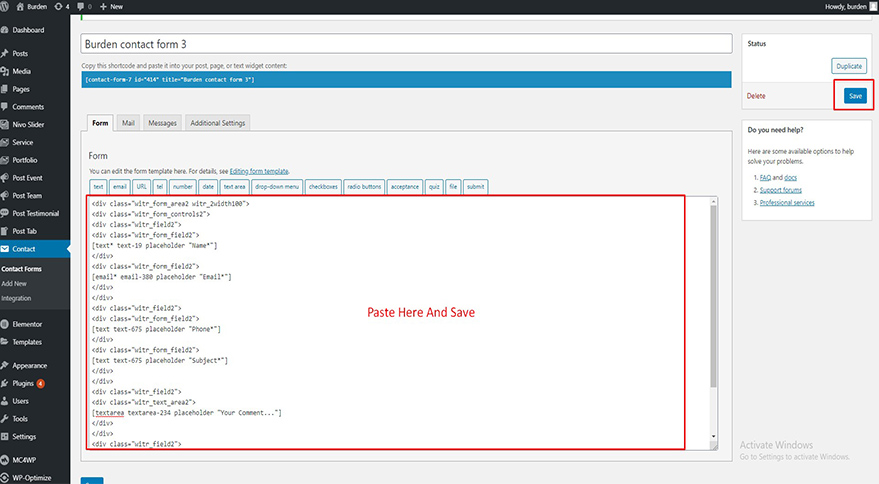
Here is the Contact Form 7 template form for the Contact page. We use contact Style Of our theme
	<div class="row">
	<div class="col-lg-6 col-md-6">
	<div class="twr_form_box">
	[text* text-30 class:form-control placeholder "Name*"]
	</div>
	</div>
	<div class="col-lg-6 col-md-6">
	<div class="twr_form_box">
	[email* email-380 class:form-control placeholder "Email*"]
	</div>
	</div>
	<div class="col-lg-6 col-md-6">
	<div class="twr_form_box ">
	[number* number-19 class:form-control placeholder "Phone*"]
	</div>
	</div>
	<div class="col-lg-6 col-md-6">
	<div class="twr_form_box">
	[text* text-30 class:form-control placeholder "Subject*"]
	</div>
	</div>
	<div class="col-lg-12 col-md-12">
	<div class="twr_form_box ">
	[textarea* textarea rows:6 class:form-control placeholder "Comments/Message"]
	</div>
	<button type="submit" class="btn btn-primary">Send Message</button>
	</div>
	</div>
Copy the code and paste you contact form area
Step 1
Step 2
Mail Set
Subscribe Form
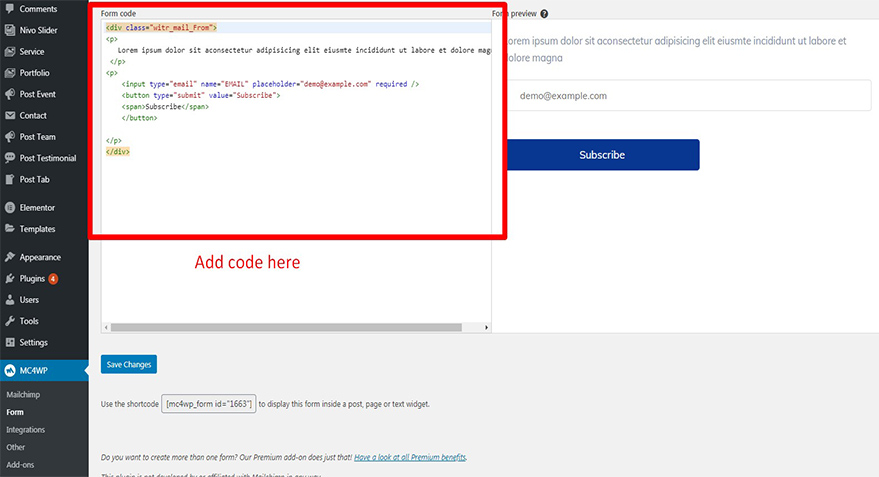
	<p>
	<input type="email" name="EMAIL" placeholder="Enter your email address" required />
	<button type="submit" value="Subscribe">
	<span>Subscribe</span>
	</button>

	</p>
	<p>
	<input type="email" name="EMAIL" placeholder="Your email address" required />
	<button type="submit">
	<i class="fa fa-send"></i>
	</button>
	</p
	<div class="witr_mail_From">
	<p>
	<input type="email" name="EMAIL" placeholder="Your Email" required="">
	<button type="submit" value="Subscribe">
	<span>Subscribe</span>
	</button>
	</p>
	</div>
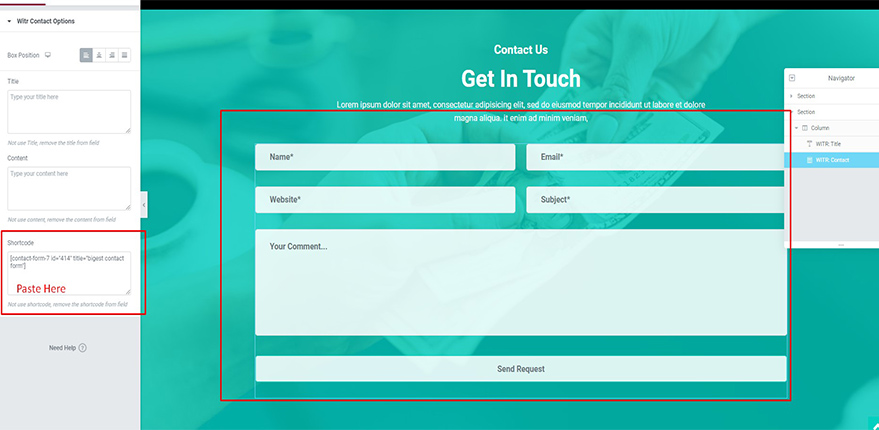
Copy the shortcode and paste the shortcode in element area
Step 1

Onepage Link
One Page Theme built to speed up your work experience, where you can adapt your small business or agencies. In the One Page Theme, the visitor doesn’t have to go to each link for view any section like (About, Service, Contact, Features, and Blog etc.). Visitor can see or view anything of your site by clicking a specific menu from the menu bar. Here’s main advantages are, you can update every information on one page.
How to build your OnePage with themex?
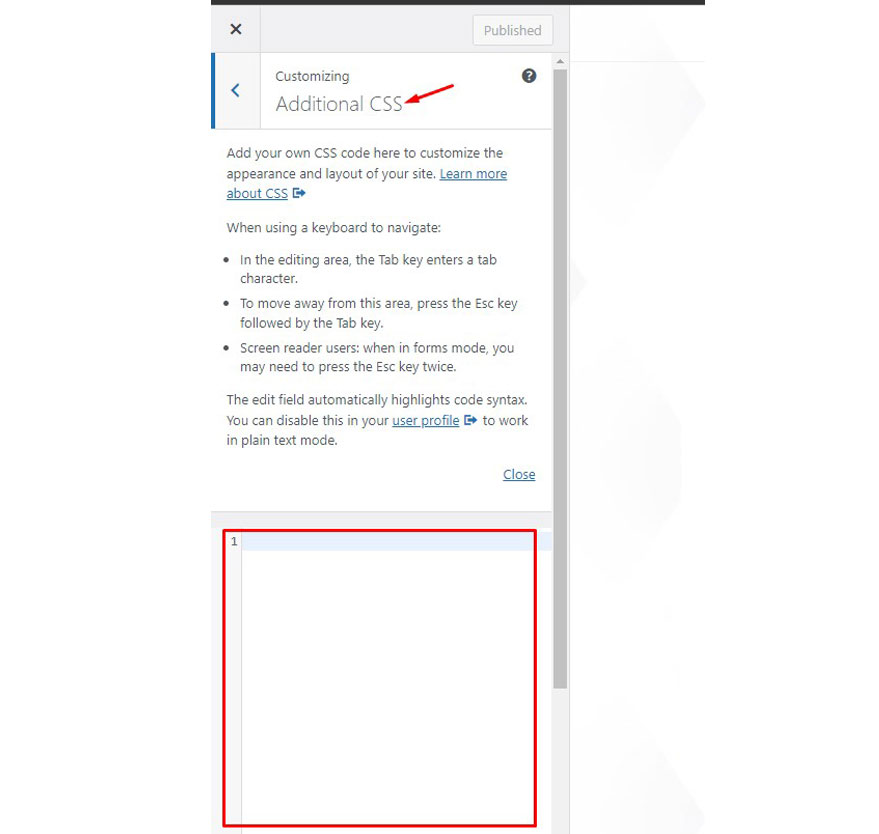
How to define a CSS ID to link a Page Section with Menu Bar?
Step:01
Step:02
- Go to your WP Dashboard
- Navigate on Page Section and Click on All Page
- Navigate your page, Which Page you want to Customize and Define New CSS ID for Linking with Page Section.
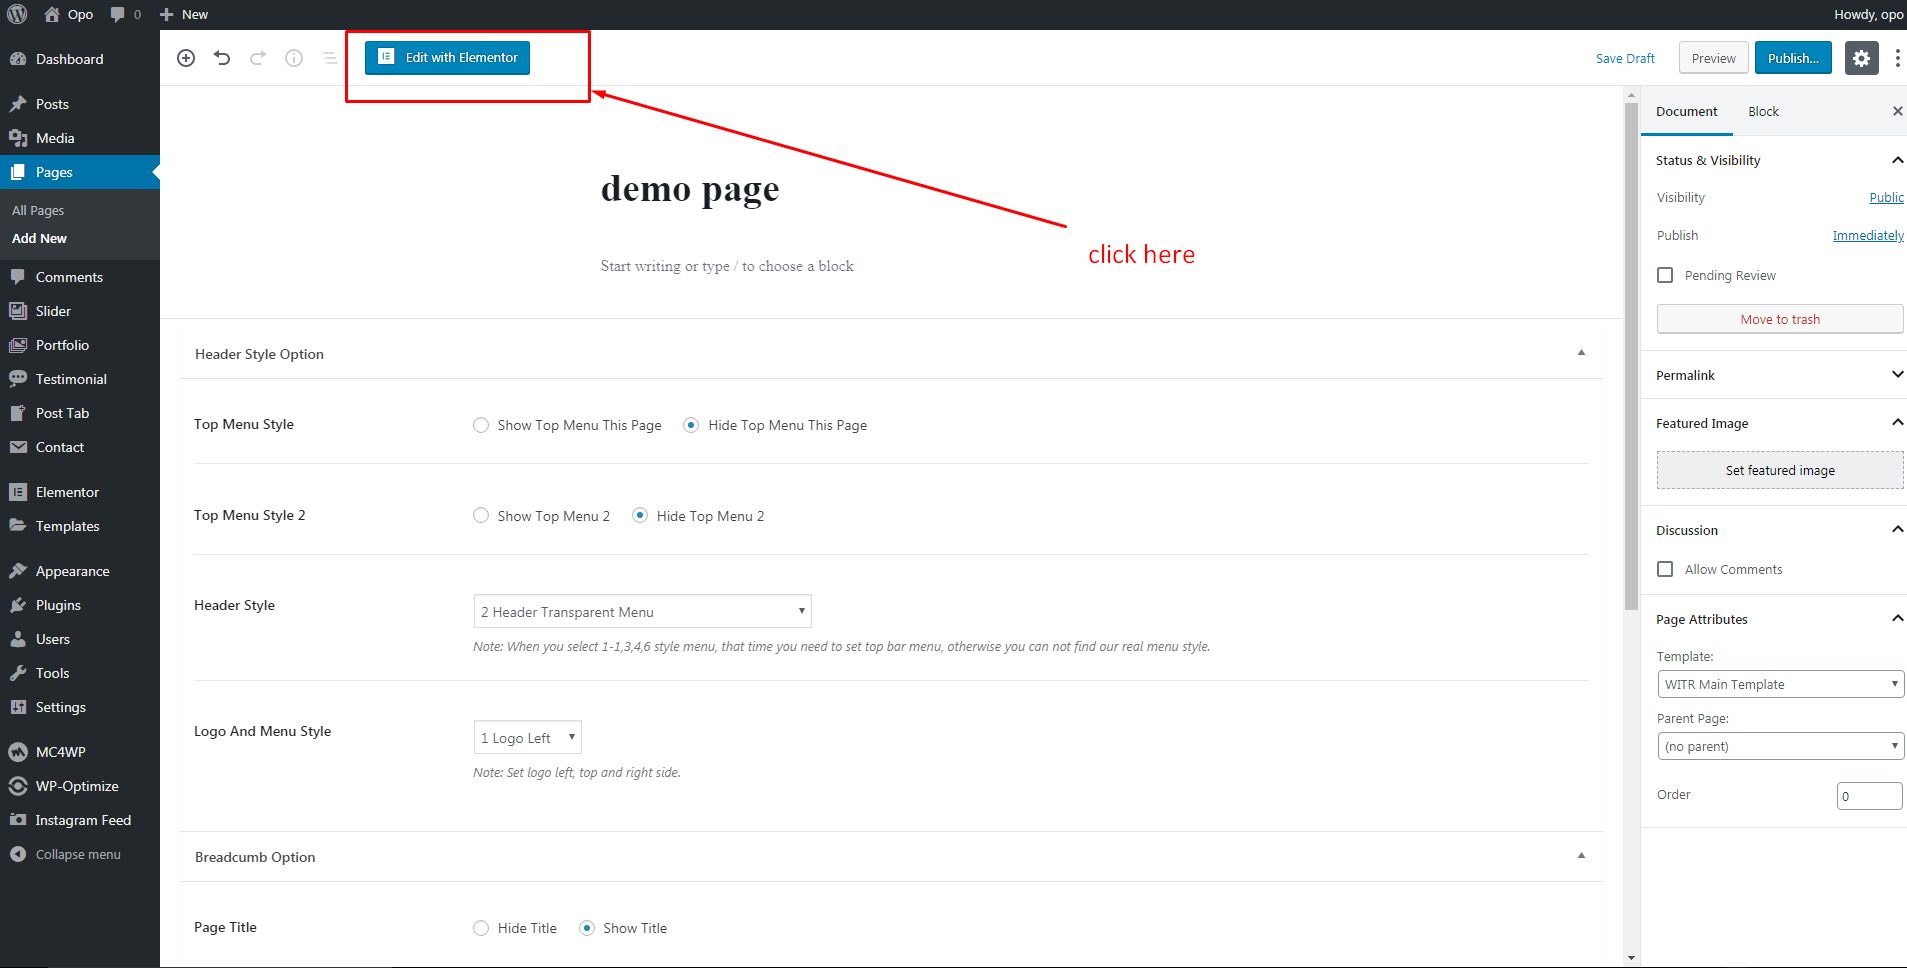
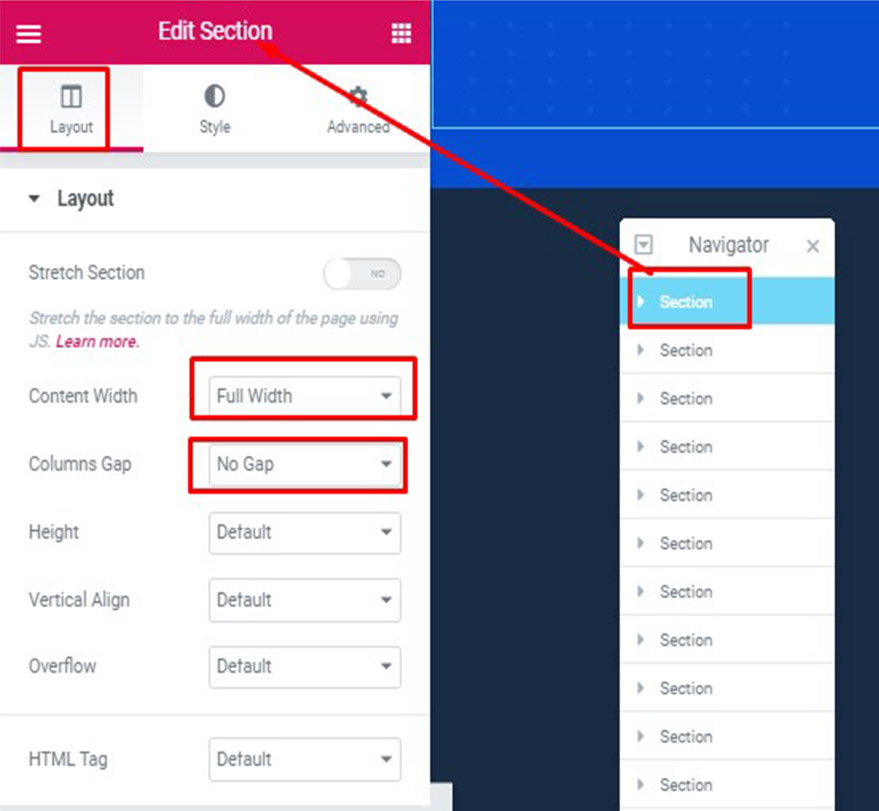
- Then click on Edit With Elementor like the following image
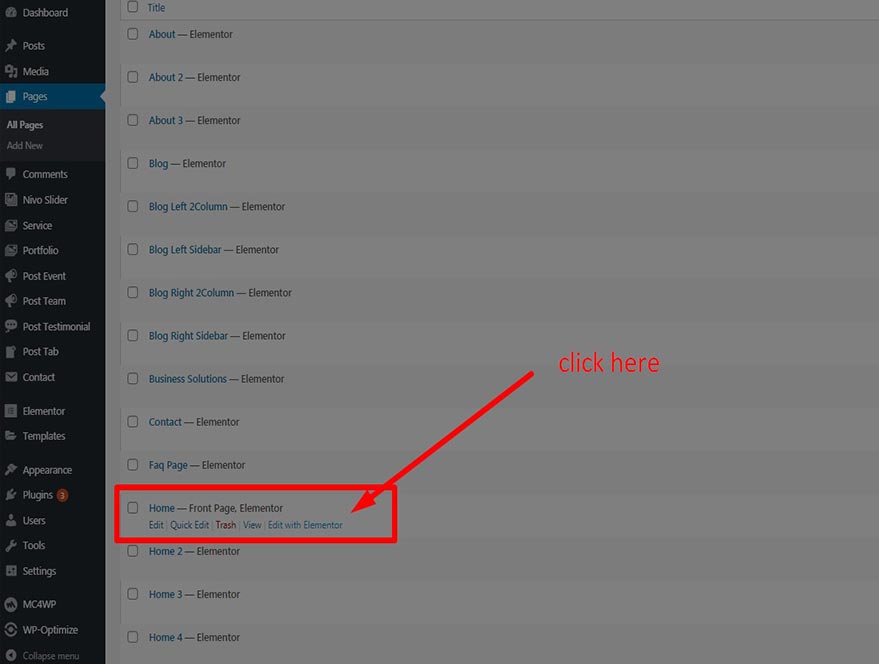
Step:03
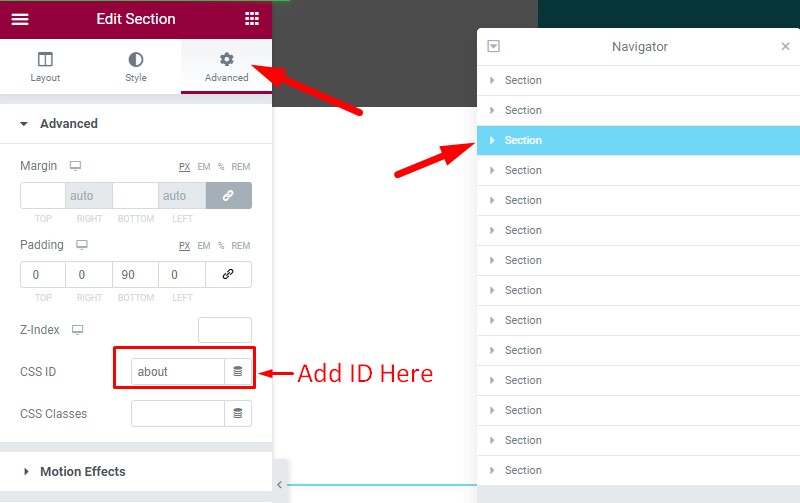
Now your Work done. You can set one page menu every where above the way
FAQs / Tips / Troubleshoots
Optimizing your images will helps your WordPress site load faster.
Download and activate WP Smush.it This plugin will optimize every image you upload and you can use the Bulk Smush.it feature to smush all of your uploaded images.
themex to WP Smush.it include Autoptimize, EWWW Image Optimizer, CW Image Optimizer, Imsanity and Hammy. Many WordPress users prefer using these plugins as they do not rely on an external server to process your images.
A common issue that can occur with users new to installing WordPress themes is a “Broken theme and/or stylesheets missing” error message being displayed when trying to upload or activate the theme. This error message does not mean that the theme you have purchased is broken, it simply means it has been uploaded incorrectly.
In this regard, follow our documentation on installing the theme from here.
We did not advertise that we included Elementor’s Pro features in our theme. And there is no way to do that, too, because Elementor needs each user (who wants to get Pro features) to purchase Pro license individually. So we, as theme authors, cannot facilitate Elementor Pro in a theme.
But we have custom-built 90+ element that are included with themex theme and you can access, use all of them using Elementor’s free version.So I think, our Element enought to Make your Website

WooCommerce
WooCommerce plugin list:
- WooCommerce
- YITH WooCommerce Wishlist
- YITH WooCommerce Quick View
- YITH WooCommerce Compare
themex WordPress theme is capability with the latest WooCommerce plugin. That’s mean you can sell products with this theme. We designed All of the Wocommerce pages (including product listing page, product details page, cart page, checkout page etc) as well.
- If you want to use WooCommerce plugin in into the theme, so, You need to install this plugin for creating your Shop with themex. You can install the plugins from Appearance > Install Plugins > Add New Plugin > then search " WooCommerce ". you can see the WooCommerce plugin. Install the plugin and Active it.
- Now Set the shop page here.
Step 1
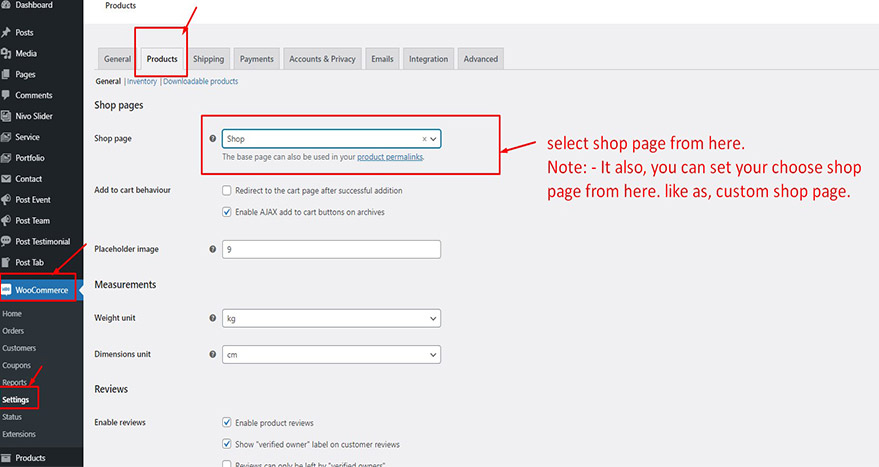
Note: if you see, your shop page auto select here. but your shop page not working. that time, Please check your shop page from the admin page menu. you can see 2 shop page. Please delete the first shop page and select the second shop page here. Now it will work.
Updating The Theme
Updating Methods
There are 3 methods to update WordPress themes to the newer version. These new updates are essential if you want to have a bug free website as we give new features and improvements to the theme over time. Some of these updates might be needed in order to make the theme compatible with WordPress newer versions. There is no risk of losing your settings and pages. However if you had done modifications in parent theme files, then they will be lost.
Please note that before updating a theme, we recommend you to make a backup of your modified files. Also, we recommend to deactivate its current version and then upload the zip file with the new theme version then activate and update the theme.
Update Using FTP
- Login in to your TemplateMonster account and go to downloads (Dashboard > downloads)
- Download the theme into your computer
- Install an FTP program (Filezilla is free)
- Retrieve your FTP login information from your hosting admin panel and login into your hosting via FTP
- Unzip the item main file
- Locate the themex.zip file and unzip it. Make sure your unzipping software does not create an extra directory with the same name nested into each other.
- Drag and drop theme main folder into your FTP program with the destination: “YOUR_THEME_ROOT/wp-content/themes/”
- FTP program will give a warning that there is an existing with the same directory name, Delete the theme and don't reload your site.
- Now Upload your theme, When finished uploaded, Now go to your WP dashboard and reload it.
- Work Done
- Now Update your witr Helper Plugin. Go to your WP plugin area and delete witr Helper Plugin
- don't reload your site and you can get a notice of your Install witr Helper Plugin. Please Install and Active It.
- Plugin Install Done. you can Reload Now your site
Update Through WordPress Admin Panel
- Navigate to Appearance > Themes Activate another theme to deactivate the themex theme
- Delete the installed themex theme.
- Unzip the file you just downloaded from TemplateMonster and locate the WordPress Theme themex.zip
- Still within the Themes section, on the header tab, click on “Install Themes”, then on the header second tab click “Upload”.
- Click “Browse…” and locate the new theme file themex.zip
- Click “Install Now”.
- Click “Activate”.
Change Logs
							----- New Release -----
							Version 1.0.4
Support
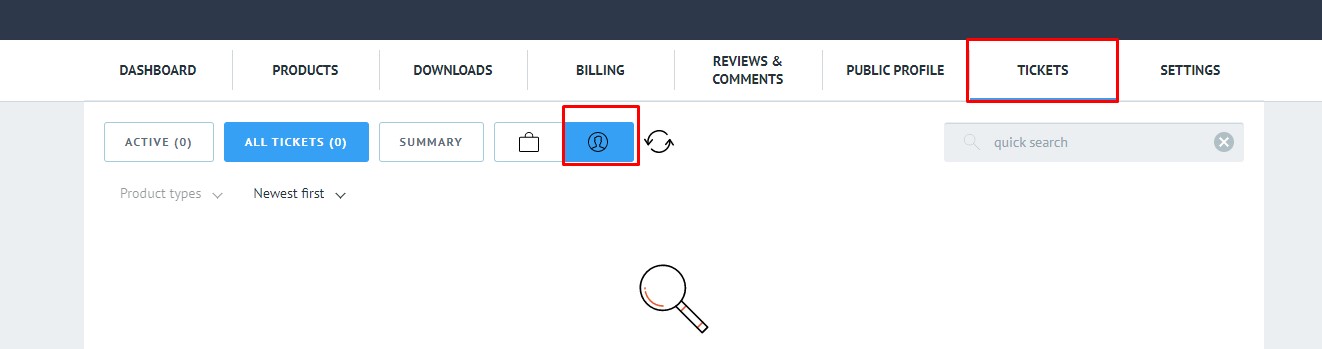
If you find anything missing in our theme, please message us once via ticket.
Thank You Very Much
Thank you for using our theme, face any problem, Please message us via a ticket from your profile into your support area.